prometheus
## 什么是Prometheus?
Prometheus是一个开源的系统监控和报警系统,现在已经加入到CNCF基金会,成为继k8s之后第二个在CNCF托管的项目,在kubernetes容器管理系统中,通常会搭配prometheus进行监控,同时也支持多种exporter采集数据,还支持pushgateway进行数据上报,Prometheus性能足够支撑上万台规模的集群。
## 工作过程
●Tsdb有自带的查询语言promql,可以查询监控数据
●报警方式是通过promq|写规则,与你设置的阈值进行匹配,超过
阈值报警,这个组件也是独立的,alertmanager
●Server同时提供了简单的ui,可以查看配置查询数据,当然通常
的展示借助第三方插件比如grafana
## prometheus特点
**1.多维度数据模型**
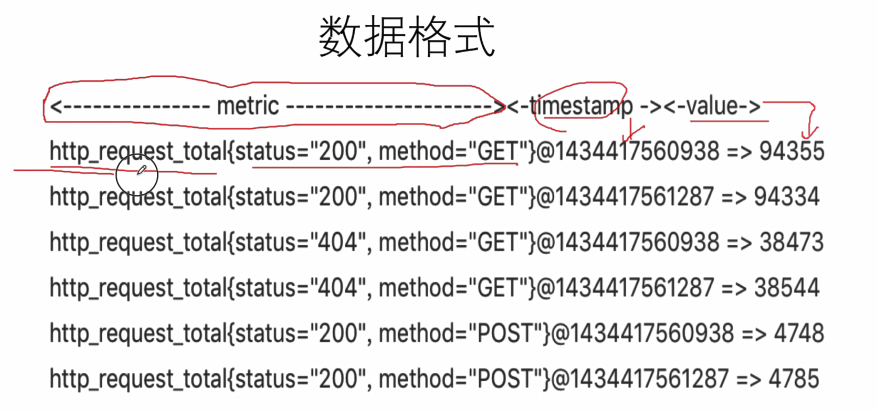
**每一个时间序列数据都由metric度量指标名称和它的标签labels键值对集合唯一确定:这个metric度量指标名称指定监控目标系统的测量特征(如:http_requests_total- 接收http请求的总计数)。labbels开启了Prometheus的多维数据模型:对于相同的度量名称,通过不同标签列表的结合, 会形成特定的度量维度实例。(例如:所有包含度量名称为/api/tracks的http请求,打上method=POST的标签,则形成了具体的http请求)。这个查询语言在这些度量和标签列表的基础上进行过滤和聚合。改变任何度量上的任何标签值,则会形成新的时间序列图。**
**2.灵活的查询语言(PromQL)**
**可以对采集的metrics指标进行加法,乘法,连接等操作;**
**3.可以直接在本地部署,不依赖其他分布式存储;**
**4.通过基于HTTP的pull方式采集时序数据;**
**5.可以通过中间网关pushgateway的方式把时间序列数据推送到prometheus server端;**
**6.可通过服务发现或者静态配置来发现目标服务对象(targets)。**
**7.有多种可视化图像界面,如Grafana等。**
**8.高效的存储,每个采样数据占3.5 bytes左右,300万的时间序列,30s间隔,保留60天,消耗磁盘大概200G。**
**9.做高可用,可以对数据做异地备份,联邦集群,部署多套prometheus,pushgateway上报数据**
## prometheus组件
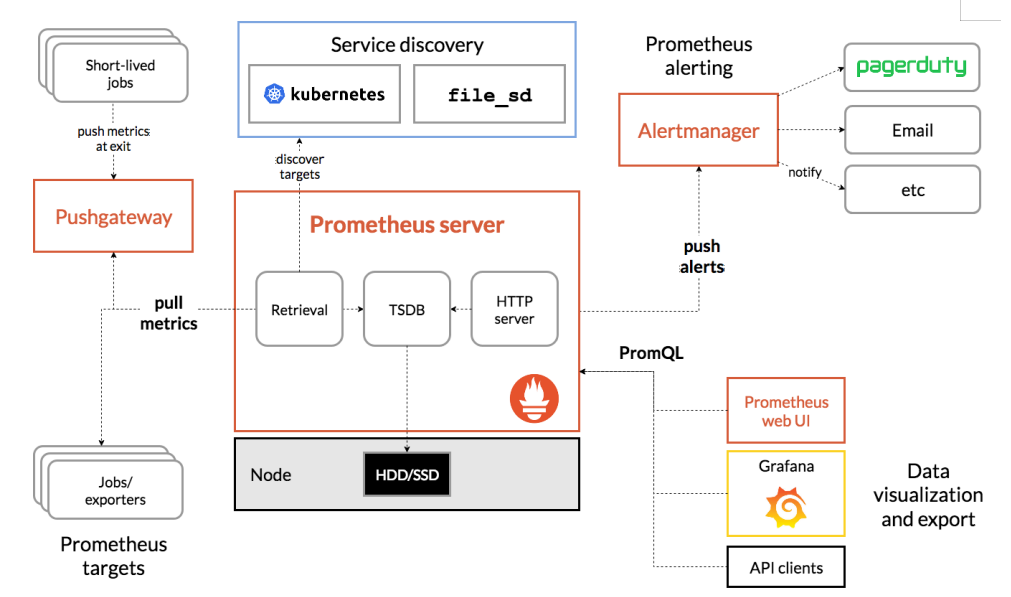
从上图可发现,Prometheus整个生态圈组成主要包括`prometheus server`,`Exporter`,`pushgateway`,`alertmanager`,`grafana`,`Web ui`界面,`Prometheus server`由三个部分组成,`Retrieval`,`Storage`,`PromQL`.
1.`Retrieval`负责在活跃的target主机上抓取监控指标数据
2.`Storage`存储主要是把采集到的数据存储到磁盘中
3.`PromQL`是Prometheus提供的查询语言模块。
**1.Prometheus Server:**
用于收集和存储时间序列数据。
**2.Client Library:**
客户端库,检测应用程序代码,当`Prometheus`抓取实例的HTTP端点时,客户端库会将所有跟踪的metrics指标的当前状态发送到`prometheus server`端。
**3.Exporters:**
`prometheus`支持多种`exporter`,通过`exporter`可以采集`metrics`数据,然后发送到`prometheus server`端,所有向`promtheus server`提供监控数据的程序都可以被称为`exporter`
[快速了解prometheus如何编写exporter](https://www.cnblogs.com/sindragosa/p/14142363.html)
[从零开始写一个Exporter](https://www.cnblogs.com/makelu/p/11082485.html)
**4.Alertmanager:**
从` Prometheus server` 端接收到 `alerts `后,会进行去重,分组,并路由到相应的接收方,发出报警,常见的接收方式有:电子邮件,微信,钉钉, slack等。
**5.Grafana**
监控仪表盘,可视化监控数据
**6.pushgateway:**
各个目标主机可上报数据到`pushgatewy`,然后`prometheus server`统一从`pushgateway`拉取数据。
```
Pushgateway 是 Prometheus 生态中一个重要工具,使用它的原因主要是:
Prometheus 采用 pull 模式,可能由于不在一个子网或者防火墙原因,导致 Prometheus 无法直接拉取各个 target 数据。
在监控业务数据的时候,需要将不同数据汇总, 由 Prometheus统一收集。
由于以上原因,不得不使用 pushgateway,但在使用之前,有必要了解一下它的一些弊端:
将多个节点数据汇总到 pushgateway, 如果 pushgateway 挂了,受影响比多个 target 大。
Prometheus 拉取状态 up 只针对 pushgateway, 无法做到对每个节点有效。
Pushgateway 可以持久化推送给它的所有监控数据。
因此,即使你的监控已经下线,prometheus 还会拉取到旧的监控数据,需要手动清理 pushgateway 不要的数据。
```
## prometheus几种部署模式
### 基本HA模式
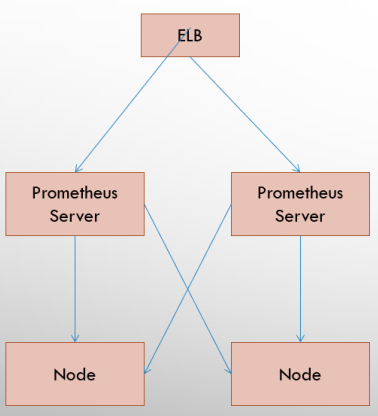
基本的HA模式只能确保Promthues服务的可用性问题,但是不解决`Prometheus Server`之间的数据一致性问题以及持久化问题(数据丢失后无法恢复),也无法进行动态的扩展。因此这种部署方式适合监控规模不大,`Promthues Server`也不会频繁发生迁移的情况,并且只需要保存短周期监控数据的场景。
### 基本HA + 远程存储方案
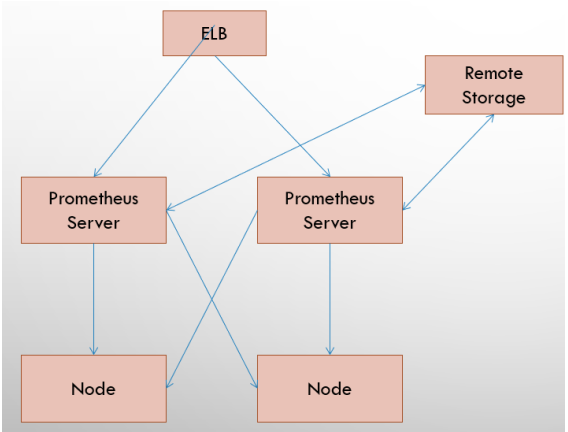
在解决了`Promthues`服务可用性的基础上,同时确保了数据的持久化,当`Promthues Server`发生宕机或者数据丢失的情况下,可以快速的恢复。 同时`Promthues Server`可能很好的进行迁移。因此,该方案适用于用户监控规模不大,但是希望能够将监控数据持久化,同时能够确保`Promthues Server`的可迁移性的场景。
### 基本HA + 远程存储 + 联邦集群方案
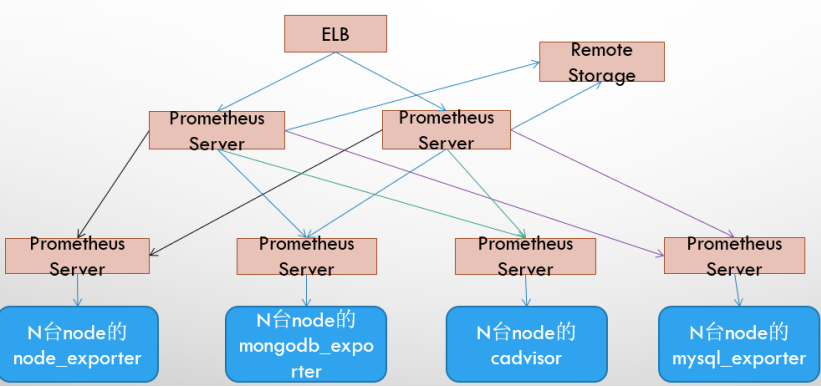
`Promthues`的性能瓶颈主要在于大量的采集任务,因此用户需要利用Prometheus联邦集群的特性,将不同类型的采集任务划分到不同的`Promthues`子服务中,从而实现功能分区。例如一个`Promthues Server`负责采集基础设施相关的监控指标,另外一个`Prometheus Server`负责采集应用监控指标。再有上层`Prometheus Server`实现对数据的汇聚。
## prometheus工作流程
1.`Prometheus server`可定期从活跃的(up)目标主机上(target)拉取监控指标数据,目标主机的监控数据可通过配置静态job或者服务发现的方式被`prometheus server`采集到,这种方式默认的pull方式拉取指标;也可通过`pushgateway`把采集的数据上报到`prometheus server`中;还可通过一些组件自带的`exporter`采集相应组件的数据;
2.`Prometheus server`把采集到的监控指标数据保存到本地磁盘或者数据库;
3.`Prometheus`采集的监控指标数据按时间序列存储,通过配置报警规则,把触发的报警发送到`alertmanager`
4.`Alertmanager`通过配置报警接收方,发送报警到邮件,微信或者钉钉等
5.`Prometheus `自带的`web ui`界面提供`PromQL`查询语言,可查询监控数据
6.`Grafana`可接入`prometheus`数据源,把监控数据以图形化形式展示出
## prometheus如何更好的监控k8s?
对于Kubernetes而言,我们可以把当中所有的资源分为几类:
1、基础设施层(Node):集群节点,为整个集群和应用提供运行时资源
2、容器基础设施(Container):为应用提供运行时环境
3、用户应用(Pod):Pod中会包含一组容器,它们一起工作,并且对外提供一个(或者一组)功能
4、内部服务负载均衡(Service):在集群内,通过Service在集群暴露应用功能,集群内应用和应用之间访问时提供内部的负载均衡
5、外部访问入口(Ingress):通过Ingress提供集群外的访问入口,从而可以使外部客户端能够访问到部署在Kubernetes集群内的服务
因此,在不考虑Kubernetes自身组件的情况下,如果要构建一个完整的监控体系,我们应该考虑,以下5个方面:
1)、集群节点状态监控:从集群中各节点的kubelet服务获取节点的基本运行状态;
2)、集群节点资源用量监控:通过Daemonset的形式在集群中各个节点部署Node
Exporter采集节点的资源使用情况;
3)、节点中运行的容器监控:通过各个节点中kubelet内置的cAdvisor中获取个节点中所有容器的运行状态和资源使用情况;
4)、从黑盒监控的角度在集群中部署Blackbox Exporter探针服务,检测Service和Ingress的可用性;
5)、如果在集群中部署的应用程序本身内置了对Prometheus的监控支持,那么我们还应该找到相应的Pod实例,并从该Pod实例中获取其内部运行状态的监控指标。
## 安装采集节点资源指标组件node-exporter
node-exporter是什么?
采集机器(物理机、虚拟机、云主机等)的监控指标数据,能够采集到的指标包括CPU, 内存,磁盘,网络,文件数等信息。
`https://github.com/prometheus/node_exporter/releases/tag/v1.3.1`
安装node-exporter组件,在k8s集群的控制节点操作
```
[root@jkl1234 ~]# kubectl create ns monitor-sa
[root@jkl1234 ~]# kubectl apply -f node-export.yaml
```
`node-export.yaml `
```
apiVersion: apps/v1
kind: DaemonSet
metadata:
name: node-exporter
labels:
name: node-exporter
spec:
selector:
matchLabels:
name: node-exporter
template:
metadata:
labels:
name: node-exporter
spec:
hostPID: true
hostIPC: true
hostNetwork: true
containers:
- name: node-exporter
image: prom/node-exporter:v0.16.0
ports:
- containerPort: 9100
resources:
requests:
cpu: 0.15
securityContext:
privileged: true
args:
- --path.procfs
- /host/proc
- --path.sysfs
- /host/sys
- --collector.filesystem.ignored-mount-points
- '"^/(sys|proc|dev|host|etc)($|/)"'
volumeMounts:
- name: dev
mountPath: /host/dev
- name: proc
mountPath: /host/proc
- name: sys
mountPath: /host/sys
- name: rootfs
mountPath: /rootfs
tolerations:
- key: "node-role.kubernetes.io/master"
operator: "Exists"
effect: "NoSchedule"
volumes:
- name: proc
hostPath:
path: /proc
- name: dev
hostPath:
path: /dev
- name: sys
hostPath:
path: /sys
- name: rootfs
hostPath:
path: /
```
查看node-exporter是否部署成功
```
[root@jkl1234 prom]# kubectl -n monitor-sa get pod
NAME READY STATUS RESTARTS AGE
node-exporter-s4b5g 1/1 Running 0 5m55s
```
通过node-exporter采集数据
`curl http://主机ip:9100/metrics`
#node-export默认的监听端口是9100,可以看到当前主机获取到的所有监控数据
`curl http://localhost:9100/metrics | grep node_cpu_seconds`
显示本机机cpu的使用情况
```
# HELP node_cpu_seconds_total Seconds the cpus spent in each mode.
# TYPE node_cpu_seconds_total counter
node_cpu_seconds_total{cpu="0",mode="idle"} 72963.37
node_cpu_seconds_total{cpu="0",mode="iowait"} 9.35
node_cpu_seconds_total{cpu="0",mode="irq"} 0
node_cpu_seconds_total{cpu="0",mode="nice"} 0
node_cpu_seconds_total{cpu="0",mode="softirq"} 151.4
node_cpu_seconds_total{cpu="0",mode="steal"} 0
node_cpu_seconds_total{cpu="0",mode="system"} 656.12
node_cpu_seconds_total{cpu="0",mode="user"} 267.1
```
#HELP:解释当前指标的含义,上面表示在每种模式下node节点的cpu花费的时间,以s为单位
#TYPE:说明当前指标的数据类型,上面是counter类型
node_cpu_seconds_total{cpu="0",mode="idle"} :
cpu0上idle进程占用CPU的总时间,CPU占用时间是一个只增不减的度量指标,从类型中也可以看出node_cpu的数据类型是counter(计数器)
counter计数器:只是采集递增的指标
```
[root@jkl1234 prom]# curl http://192.168.1.63:9100/metrics | grep node_load
# HELP node_load1 1m load average.
# TYPE node_load1 gauge
node_load1 0.1
```
node_load1该指标反映了当前主机在最近一分钟以内的负载情况,系统的负载情况会随系统资源的使用而变化,因此node_load1反映的是当前状态,数据可能增加也可能减少,从注释中可以看出当前指标类型为gauge(标准尺寸)
gauge标准尺寸:统计的指标可增加可减少
## 数据类型
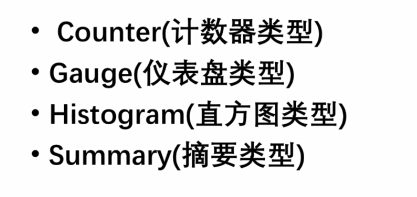
### counter
●Counter类型的指标的工作方式和计数器一样,只增不减(除非
系统发生了重置)。Counter一般用于累计值,例如记录请求次
数、任务完成数、错误发生次数
●通常来讲,许多指标counter本身并没有什么意义,有意义的是
counter随时间的变化率
### Gauge
●Gauge是可增可减的指标类,可以用于反应当前应用的状态。
●比如机器内存,磁盘可用空间大小等等
●node_memory_MemAvailable_bytes/node_filesystem_avail_bytes
### Histogram(客户端计算)
●Histogram由< basename>_bucket, <basename>_sum,_count组成
●主要用于表示一段时间范围内对数据进行采样(通常是请求持续时间或响应时间大小,为什么不用平均值,可能在某些情况下平均响应时间为20ms,假设某一刻突然有一笔交易响应时间达到10s,会极大拉高平均值),并能够对其指定区间以及总数进行统计,通常它采集的数据展示为直方图。
●事件发生的总次数,basename_count。
●所有事件产生值的大小的总和,basename_sum。
●事件产生的值分布在bucket中的次数
### Summary
●Summary类型和Histogram类型相似,由`<basename>{quantile=“< φ>”}`, `<basename>_sum`,`<basename>_count`组成,主要用于表示一段时间内数据采样结果(通常时请求持续时间或响应大小),它直接存储了分位数据,而不是根据统计区间计算出来的。
## 在k8s集群中安装Prometheus server服务
创建sa账号
#在k8s集群的控制节点操作,创建一个sa账号
`kubectl create serviceaccount monitor -n monitor-sa`
#把sa账号monitor通过clusterrolebing绑定到clusterrole上
`kubectl create clusterrolebinding monitor-clusterrolebinding -n monitor-sa --clusterrole=cluster-admin --serviceaccount=monitor-sa:monitor`
#注意:如果行上面授权会报错,那就需要下面的授权命令:
`kubectl create clusterrolebinding monitor-clusterrolebinding-1 -n monitor-sa --clusterrole=cluster-admin --user=system:serviceaccount:monitor:monitor-sa`
创建数据目录:
`mkdir /data && chmod 777 /data/`
安装prometheus服务
以下步骤均在k8s集群的控制节点操作:
创建一个configmap存储卷,用来存放prometheus配置信息
prometheus-cfg.yaml文件在课件,可自行上传到自己k8s的控制节点,内容如下:
```
cat prometheus-cfg.yaml
---
kind: ConfigMap
apiVersion: v1
metadata:
labels:
app: prometheus
name: prometheus-config
namespace: monitor-sa
data:
prometheus.yml: |
global:
scrape_interval: 15s
scrape_timeout: 10s
evaluation_interval: 1m
scrape_configs:
- job_name: 'kubernetes-node'
kubernetes_sd_configs:
- role: node
relabel_configs:
- source_labels: [__address__]
regex: '(.*):10250'
replacement: '${1}:9100'
target_label: __address__
action: replace
- action: labelmap
regex: __meta_kubernetes_node_label_(.+)
- job_name: 'kubernetes-node-cadvisor'
kubernetes_sd_configs:
- role: node
scheme: https
tls_config:
ca_file: /var/run/secrets/kubernetes.io/serviceaccount/ca.crt
bearer_token_file: /var/run/secrets/kubernetes.io/serviceaccount/token
relabel_configs:
- action: labelmap
regex: __meta_kubernetes_node_label_(.+)
- target_label: __address__
replacement: kubernetes.default.svc:443
- source_labels: [__meta_kubernetes_node_name]
regex: (.+)
target_label: __metrics_path__
replacement: /api/v1/nodes/${1}/proxy/metrics/cadvisor
- job_name: 'kubernetes-apiserver'
kubernetes_sd_configs:
- role: endpoints
scheme: https
tls_config:
ca_file: /var/run/secrets/kubernetes.io/serviceaccount/ca.crt
bearer_token_file: /var/run/secrets/kubernetes.io/serviceaccount/token
relabel_configs:
- source_labels: [__meta_kubernetes_namespace, __meta_kubernetes_service_name, __meta_kubernetes_endpoint_port_name]
action: keep
regex: default;kubernetes;https
- job_name: 'kubernetes-service-endpoints'
kubernetes_sd_configs:
- role: endpoints
relabel_configs:
- source_labels: [__meta_kubernetes_service_annotation_prometheus_io_scrape]
action: keep
regex: true
- source_labels: [__meta_kubernetes_service_annotation_prometheus_io_scheme]
action: replace
target_label: __scheme__
regex: (https?)
- source_labels: [__meta_kubernetes_service_annotation_prometheus_io_path]
action: replace
target_label: __metrics_path__
regex: (.+)
- source_labels: [__address__, __meta_kubernetes_service_annotation_prometheus_io_port]
action: replace
target_label: __address__
regex: ([^:]+)(?::\d+)?;(\d+)
replacement: $1:$2
- action: labelmap
regex: __meta_kubernetes_service_label_(.+)
- source_labels: [__meta_kubernetes_namespace]
action: replace
target_label: kubernetes_namespace
- source_labels: [__meta_kubernetes_service_name]
action: replace
target_label: kubernetes_name
```
注意:在下面的prometheus-deploy.yaml文件有个nodeName字段,这个就是用来指定创建的这个prometheus的pod调度到哪个节点上,我们这里让`nodeName=vm-16-17-centos`,也即是让pod调度到`vm-16-17-centos`节点上,因为`vm-16-17-centos`节点我们创建了数据目录/data,所以大家记住:你在k8s集群的哪个节点创建/data,就让pod调度到哪个节点。
```
cat prometheus-deploy.yaml
---
apiVersion: apps/v1
kind: Deployment
metadata:
name: prometheus-server
namespace: monitor-sa
labels:
app: prometheus
spec:
replicas: 1
selector:
matchLabels:
app: prometheus
component: server
#matchExpressions:
#- {key: app, operator: In, values: [prometheus]}
#- {key: component, operator: In, values: [server]}
template:
metadata:
labels:
app: prometheus
component: server
annotations:
prometheus.io/scrape: 'false'
spec:
nodeName: vm-16-17-centos
serviceAccountName: monitor
containers:
- name: prometheus
image: prom/prometheus:v2.2.1
imagePullPolicy: IfNotPresent
command:
- prometheus
- --config.file=/etc/prometheus/prometheus.yml
- --storage.tsdb.path=/prometheus #旧数据存储目录
- --storage.tsdb.retention=720h #何时删除旧数据,默认为15天。
- --web.enable-lifecycle #开启热加载
ports:
- containerPort: 9090
protocol: TCP
volumeMounts:
- mountPath: /etc/prometheus/prometheus.yml
name: prometheus-config
subPath: prometheus.yml
- mountPath: /prometheus/
name: prometheus-storage-volume
volumes:
- name: prometheus-config
configMap:
name: prometheus-config
items:
- key: prometheus.yml
path: prometheus.yml
mode: 0644
- name: prometheus-storage-volume
hostPath:
path: /data
type: DirectoryOrCreate # Directory
# kubectl apply -f prometheus-deploy.yaml
# kubectl -n monitor-sa get pod
NAME READY STATUS RESTARTS AGE
node-exporter-s4b5g 1/1 Running 0 45m
prometheus-server-5c4bd6d4c4-8zwq9 1/1 Running 0 15s
```
给prometheus pod创建一个service
```
cat prometheus-svc.yaml
---
apiVersion: v1
kind: Service
metadata:
name: prometheus
namespace: monitor-sa
labels:
app: prometheus
spec:
type: NodePort
ports:
- port: 9090
targetPort: 9090
protocol: TCP
selector:
app: prometheus
component: server
#通过kubectl apply 更新service
#kubectl apply -f prometheus-svc.yaml
service/prometheus created
#查看service在物理机映射的端口
# kubectl get svc -n monitor-sa
NAME TYPE CLUSTER-IP EXTERNAL-IP PORT(S) AGE
prometheus NodePort 10.10.239.129 <none> 9090:31481/TCP 10s
```
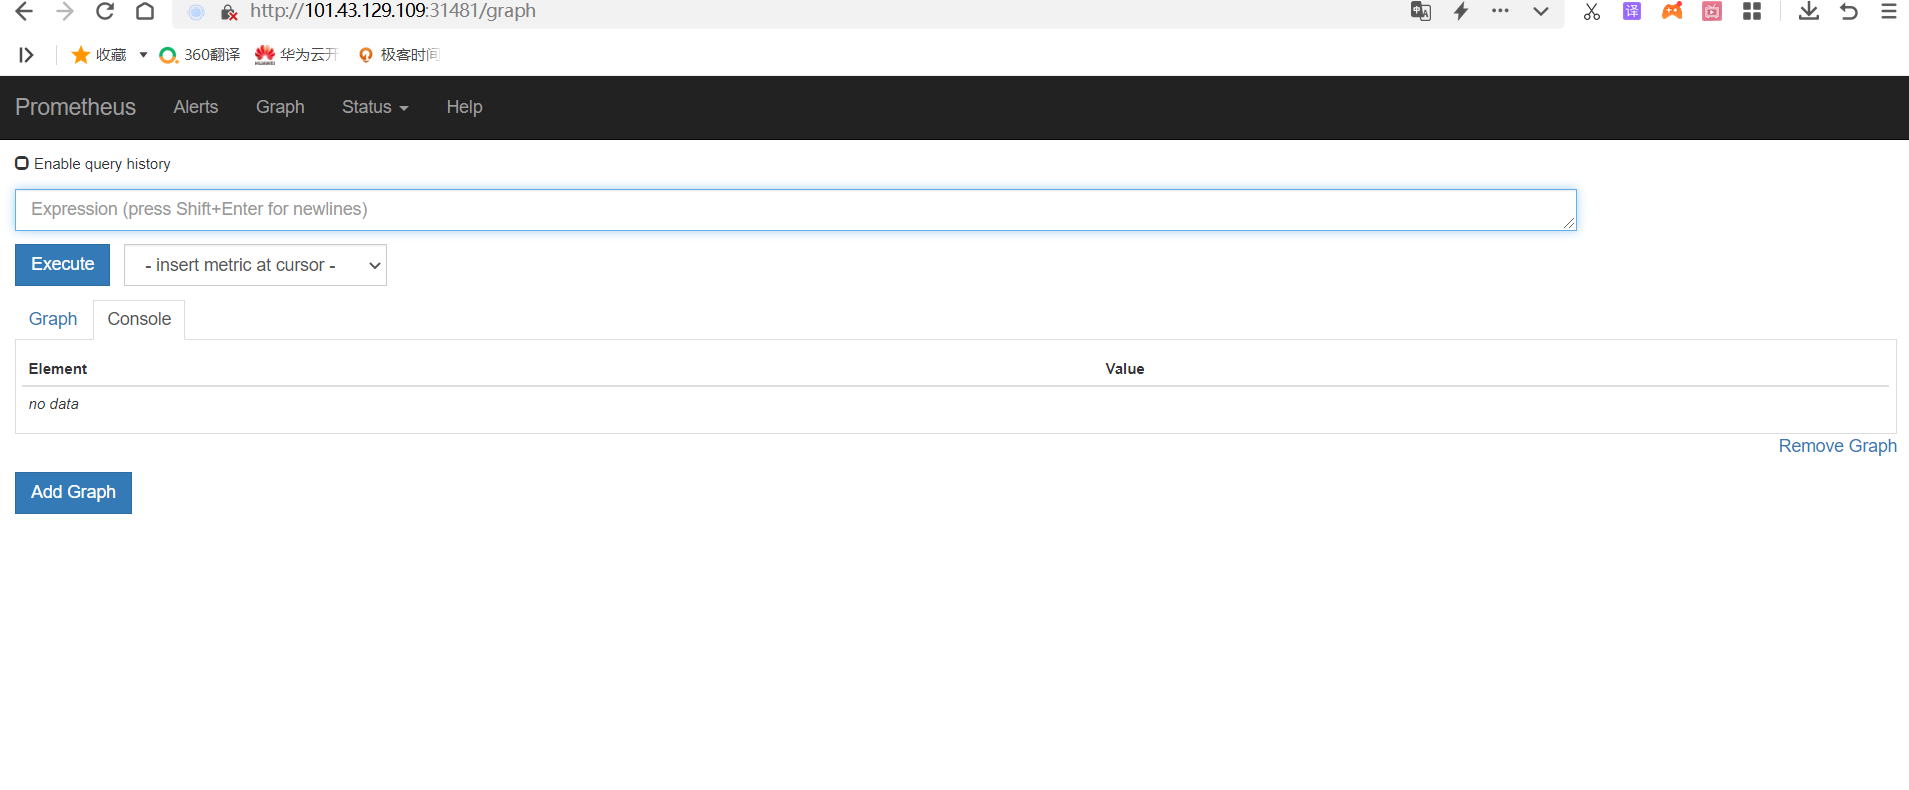
通过上面可以看到service在宿主机上映射的端口是31481,这样我们访问k8s集群的控制节点的ip:31481,就可以访问到prometheus的web ui界面了
#访问`prometheus web ui`界面
可看到如下页面:
热加载:
`curl -X POST http://podip:9090/-/reload`
## 二进制安装prometheus
[二进制包下载地址](https://prometheus.io/download/)
```
mkdir -p /mnt/prometheus && cd /mnt/prometheus
wget https://github.com/prometheus/prometheus/releases/download/v2.37.5/prometheus-2.37.5.linux-amd64.tar.gz
tar -xf prometheus-2.37.5.linux-amd64.tar.gz
mv prometheus-2.37.5.linux-amd64 prometheus
cd prometheus
# 测试运行一下
./prometheus --config.file=prometheus.yml --web.listen-address=:9098
```
创建prometheus.service文件
```
cat > /etc/systemd/system/prometheus.service <<EOF
[Unit]
Description=Prometheus Server
Documentation=https://prometheus.io/docs/introduction/overview/
After=network.target
[Service]
Restart=on-failure
WorkingDirectory=/mnt/prometheus/prometheus
ExecStart=/mnt/prometheus/prometheus/prometheus --config.file=/mnt/prometheus/prometheus/prometheus.yml --web.listen-address=:9098
[Install]
WantedBy=multi-user.target
EOF
systemctl daemon-reload
systemctl restart prometheus
systemctl enable prometheus
# 这里prometheus默认的9090端口被占用 修改成了9098,yaml中监控的9090也要修改成对应的9098,然后重启服务或热加载
systemctl restart prometheus
# curl -X POST http://localhost:9098/-/reload
```
[node_exporter1.2.2官方二进制下载地址](https://github.com/prometheus/node_exporter/releases/download/v1.2.2/node_exporter-1.2.2.linux-amd64.tar.gz)
可参考上面daemonset方式部署
添加监控任务
```
[root@master67 prometheus]# cat prometheus.yml |sed /#/d
global:
alerting:
alertmanagers:
- static_configs:
- targets:
rule_files:
scrape_configs:
- job_name: "prometheus"
static_configs:
- targets: ["localhost:9098"]
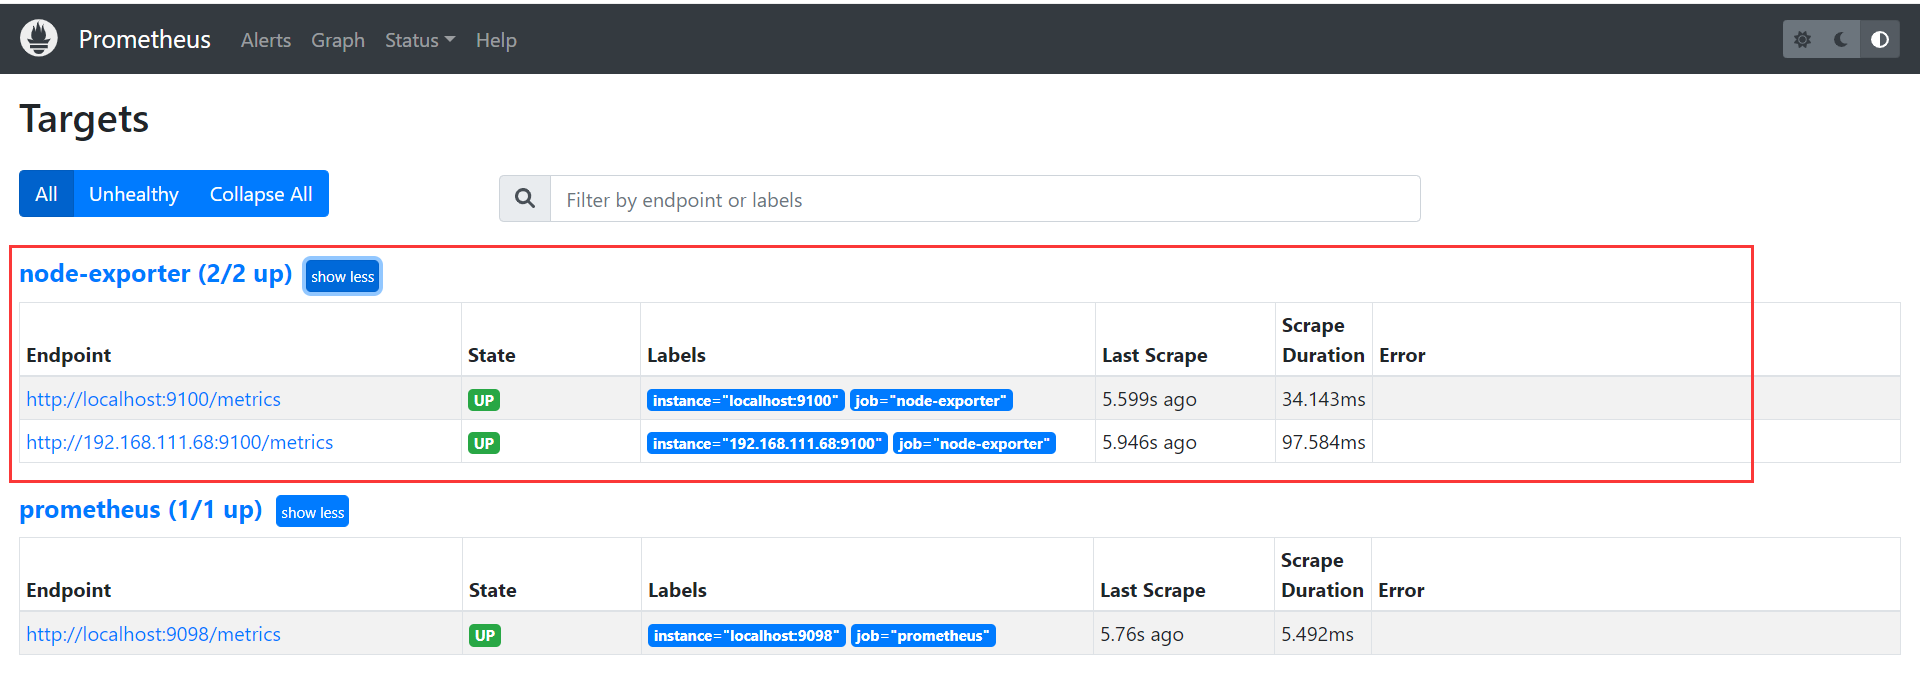
- job_name: "node-exporter"
static_configs:
- targets: ["localhost:9100","192.168.111.68:9100"]
```
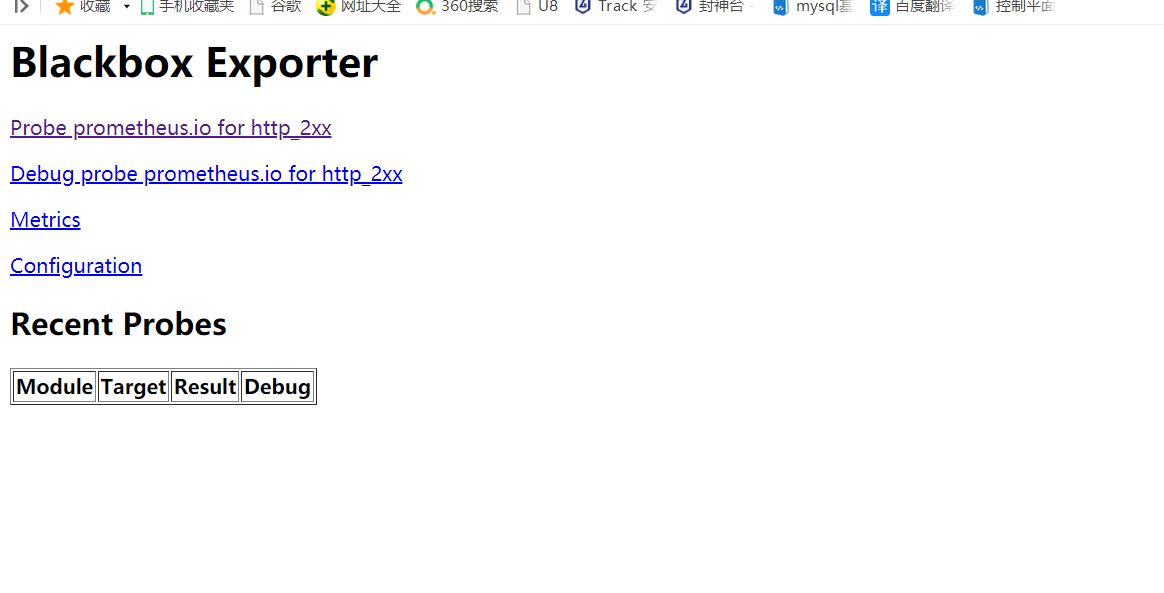
### blackbox exporter
[blackbox_exporter](https://prometheus.io/download/#blackbox_exporter)是Prometheus官方提供的一个exporter,可以通过HTTP,HTTPS,DNS,TCP和ICMP对被监控节点进行监控和数据采集
- HTTP/HTPPS:URL/API可用性检测
- TCP:端口监听检测
- ICMP:主机存活检测
- DNS:域名解析
`blackbox-exporter.yaml`
[look](https://www.cnblogs.com/hsyw/p/14461502.html)
```
vim blackbox-exporter.yaml
kubectl apply -f blackbox-exporter.yaml
```
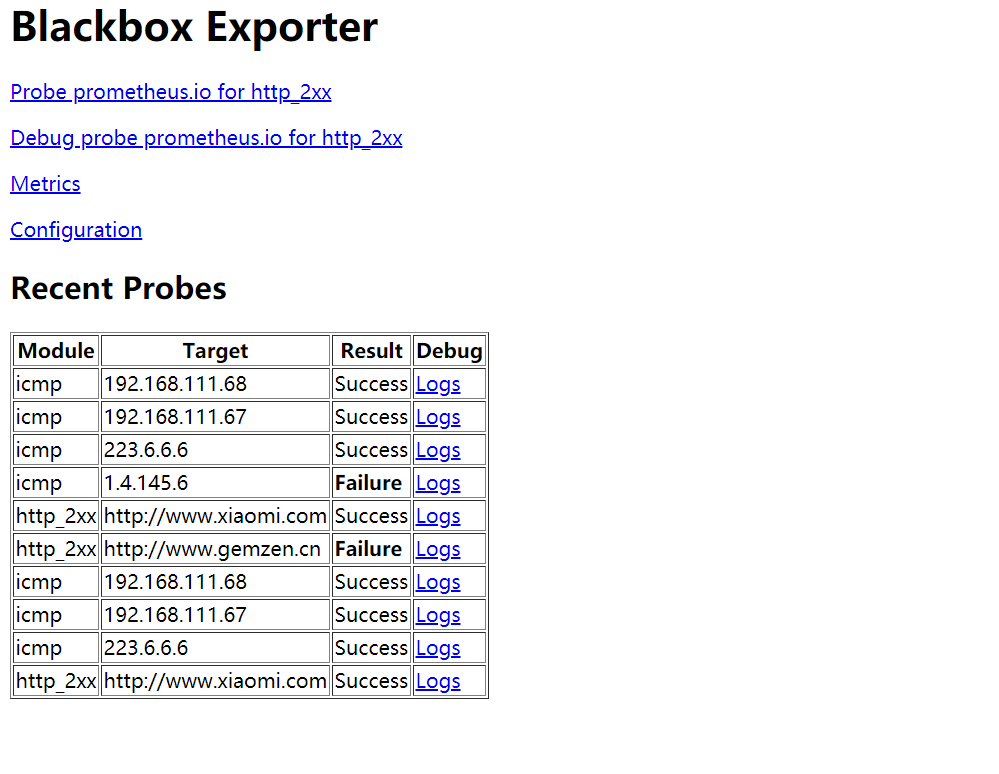
#### blackbox exporter实现URL监控
prometheus调用blackbox exporter实现对URL/ICMP的监控
```
cat prometheus/prometheus.yml
# 网站监控
- job_name: 'http_status'
metrics_path: /probe
params:
# 指定blackbox的模块
module: [http_2xx]
static_configs:
# 定义要监控的URL
# 这要求blackbox服务器能够解析这些域名并能够访问这些网站
- targets: ['http://www.xiaomi.com', 'http://www.gemzen.cn']
# 自行添加的k-v格式数据 用于promeQL的查询
labels:
instance: http_status
group: web
#relabel通过将 __address__(当前目标地址)写入__param_target标签来创建一个label
relabel_configs:
# __address__是一个变量 表示targets中每一个URL的IP地址
# source_labels和target_label是一个k-v 二者生成一个新的label
# 其中target_label是key source_labels是value
- source_labels: [__address__]
# 本例中__param_target即为www.xiaomi.com 和 www.gemzen.com
target_label: __param_target
- source_labels: [__param_target]
# url类似于K8S中pod的label
# 本例中就会有2个k-v url:www.xiaomi.com 和 url:www.gemzen.com
# 用于绘图用 只是监控的话可以不加
target_label: url
- target_label: __address__
# replacement:是blackbox的地址 表示将监控项传递给blackbox
replacement: 192.168.111.67:9115
```
icmp监控
```
# icmp 检测
- job_name: 'ping_status'
metrics_path: /probe
params:
module: [icmp]
static_configs:
- targets: ["192.168.0.191","223.6.6.6"]
labels:
instance: 'ping_status'
group: 'icmp'
relabel_configs:
- source_labels: [__address__]
target_label: __param_target
- source_labels: [__param_target]
#以ip为key __param_target为value 创建一个k-v作为label
target_label: ip
- target_label: __address__
replacement: 192.168.0.207:9115
```
端口监控配置
```
# 端口监控
- job_name: 'port_status'
metrics_path: /probe
params:
module: [tcp_connect]
static_configs:
- targets: ['192.168.0.181:30002', '192.168.0.181:6443', '192.168.0.184:80', '192.168.0.204:9090']
labels:
instance: 'port_status'
group: 'port'
relabel_configs:
- source_labels: [__address__]
target_label: __param_target
- source_labels: [__param_target]
target_label: ip
- target_label: __address__
replacement: 192.168.0.207:9115
```
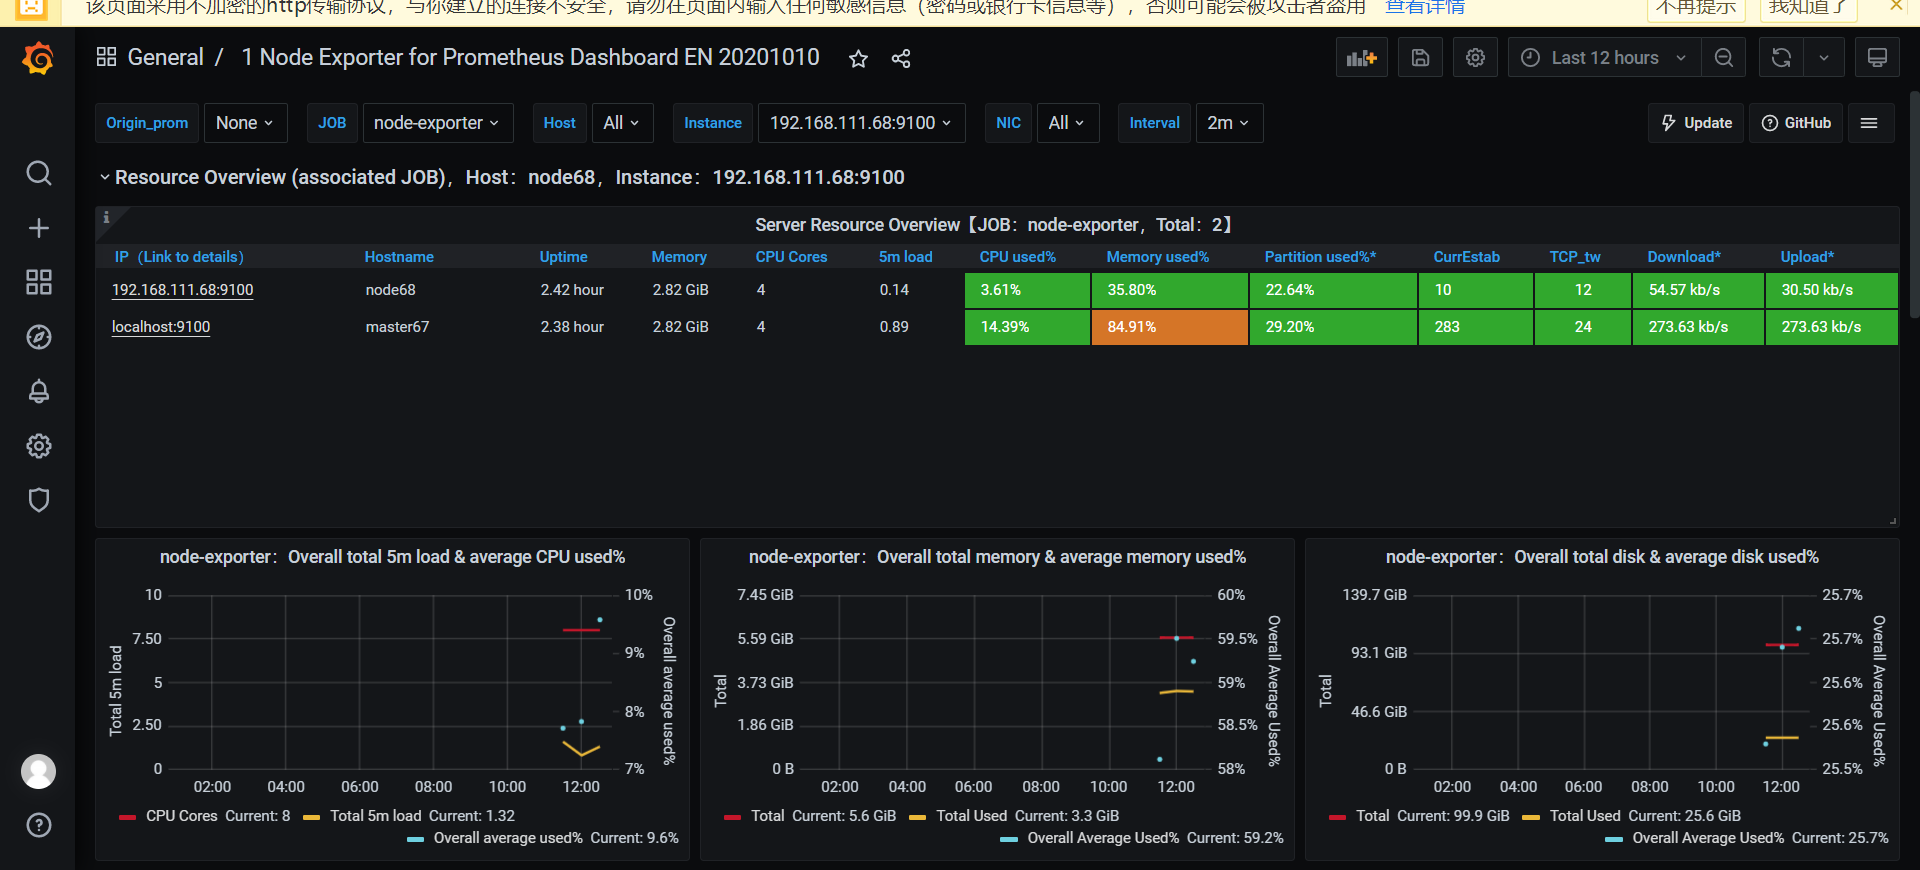
### 安装并启动grafana
[官方安装文档](https://grafana.com/docs/)
grafana是一个开源的可视化工具,可以调用prometheus、mysql等数据源进行更绚丽的前端可视化.
[下载地址](https://grafana.com/grafana/download)
此处使用的版本为grafana 7.5.11
```
wget https://dl.grafana.com/enterprise/release/grafana-enterprise-7.5.11-1.x86_64.rpm
sudo yum install grafana-enterprise-7.5.11-1.x86_64.rpm
systemctl start grafana-server
systemctl enable grafana-server
ss -tunpl|grep 3000
tcp LISTEN 0 32768 *:3000 *:* users:(("grafana-server",pid=197412,fd=10))
```
登录web界面
默认用户名和密码均为admin
添加数据源和监控模板`11074`
### cadvisor
```
docker run -d --name cadvisor -p 8080:8080 \
-v /:/rootfs:ro \
-v /var/run/:/var/run/:rw \
-v /sys/:/sys/:ro \
-v /var/lib/docker/:/var/lib/docker/:ro \
-v /dev/disk/:/dev/disk/:ro \
lagoudocker/cadvisor:v0.37.0
```